AnyDesk error signature verification


AnyDesk error signature verification


AnyDesk error signature verification


Nelle ultime settimane durante l’aggiornamento di SysLinuxOS il repository di AnyDesk presenta il seguente errore:

An error occurred during the signature verification. The repository is not updated and the previous index files will be used. GPG error: http://deb.anydesk.com all InRelease: The following signatures were invalid: EXPKEYSIG 18DF3741CDFFDE29 philandro Software GmbH <info@philandro.com>

Questo errore si presenta su tutte le distro con i repo per AnyDesk.

Per risolvere rimuovere vecchio anydesk.list:

$ sudo rm /etc/apt/sources.list.d/anydesk.list

aggiornare chiave e repository:

$ curl -fsSL https://keys.anydesk.com/repos/DEB-GPG-KEY|sudo gpg --dearmor -o /etc/apt/trusted.gpg.d/anydesk.gpg
$ echo "deb http://deb.anydesk.com/ all main" | sudo tee /etc/apt/sources.list.d/anydesk-stable.list
$ sudo apt update
AnyDesk error signature verification

enjoy 😉


Sparrow wifi su Debian 12


Sparrow wifi su Debian 12


Sparrow wifi su Debian 12


Sparrow wifi secondo me è uno strumento indispensabile per tutti quei professionisti e non solo che vogliono conoscere e controllare tutti gli aspetti della rete wifi. In pratica riunisce in una Gui tutte gli strumenti per la scansione wifi, bluetooth e gps. Maggiori informazione si trovano nella pagina del progetto. Questo fantastico strumento io lo ho inserito di default in SysLinuxOS for System Integrator. Per installarlo su Debian 12 seguire i passi successivi.

Prerequisiti
$ sudo apt-get install python3-pip gpsd gpsd-clients python3-tk python3-setuptools
Installazione moduli aggiuntivi
$ sudo pip3 install --break-system-packages QScintilla PyQtChart gps3 dronekit manuf python-dateutil numpy matplotlib

Download ed avvio

$ git clone https://github.com/ghostop14/sparrow-wifi
$ cd sparrow-wifi
$ sudo ./sparrow-wifi.py


Sparrow wifi su Debian 12

Sparrow wifi su Debian 12

enjoy 🙂

Google Chrome su Debian 12


Google Chrome su Debian 12


Google Chrome su Debian 12


Google Chrome è un browser web sviluppato da Google. È il browser web più utilizzato al mondo, con una quota di mercato del 65%. Browser multi piattaforma è presente di default su SysLinuxOS, mentre per Debian 12 seguire i passi successivi.

Prerequisiti
$ sudo apt update && sudo apt upgrade
$ sudo apt install software-properties-common apt-transport-https ca-certificates curl -y
Download GPG Keys
$ curl -fSsL https://dl.google.com/linux/linux_signing_key.pub | sudo gpg --dearmor | sudo tee /usr/share/keyrings/google-chrome.gpg >> /dev/null
Aggiungere repo
$ echo deb [arch=amd64 signed-by=/usr/share/keyrings/google-chrome.gpg] http://dl.google.com/linux/chrome/deb/ stable main | sudo tee /etc/apt/sources.list.d/google-chrome.list
Installazione
$ sudo apt update
$ sudo apt install google-chrome-stable


Google Chrome su Debian 12

enjoy 😉

Teamviewer su Debian 12


Teamviewer su Debian 12


Teamviewer su Debian 12


TeamViewer è un software di accesso remoto e condivisione dello schermo che consente agli utenti di connettersi a un altro computer da remoto. È uno dei software di accesso remoto multi piattaforma più popolari al mondo, con oltre 1 miliardo di download. Alla pari di AnyDesk è installato di default su SysLinuxOS, mentre per Debian 12 seguire i passi successivi.

Prerequisiti
$ sudo apt update
$ sudo apt upgrade
$ sudo apt install curl apt-transport-https
Download GPG Keys
$ curl -fSsL https://download.teamviewer.com/download/linux/signature/TeamViewer2017.asc | sudo gpg --dearmor | sudo tee /usr/share/keyrings/teamview.gpg > /dev/null
Aggiungere repo
$ echo "deb [arch=amd64 signed-by=/usr/share/keyrings/teamview.gpg] http://linux.teamviewer.com/deb stable main" | sudo tee /etc/apt/sources.list.d/teamviewer.list
Installazione
$ sudo apt update
$ sudo apt install teamviewer


Teamviewer su Debian 12

enjoy 🙂

Fast-cli speedtest da terminale Debian 12


Fast-cli speedtest da terminale Debian 12

Fast-cli speedtest da terminale Debian 12


Il sito Fast.com per misurare la connessione internet, è un servizo a cui provvede Netflix per far verificare se si è in grado di visualizzare i loro contenuti. Prima esisteva una versione di fast-cli, che adesso non sembra più funzionare. Questa nuova versione misura la sola velocità in download.

Installazione Debian 12 e SysLinuxOS
$ wget https://github.com/ddo/fast/releases/download/v0.0.4/fast_linux_amd64 
$ sudo install fast_linux_amd64 /usr/local/bin/fast
$ fast


Fast-cli speedtest da terminale Debian 12

enjoy 🙂

AnyDesk su Debian 12


AnyDesk su Debian 12


AnyDesk su Debian 12


Guida su come installare AnyDesk, su Debian 12 Bookworm. AnyDesk è un alternativa a Teamviewer, ed è uno strumento veloce ed affidabile per il controllo remoto. Su Debian 12 può essere installato via repository, mentre su SysLinuxOS 12 è installato di default.

Prerequisito
$ sudo apt update
$ sudo apt upgrade 
$ sudo apt install software-properties-common apt-transport-https dirmngr ca-certificates curl -y
Download GPG Keys
$ curl -fsSL https://keys.anydesk.com/repos/DEB-GPG-KEY | gpg --dearmor | sudo tee /usr/share/keyrings/anydesk.gpg > /dev/null
Aggiungere repo
$ echo 'deb [signed-by=/usr/share/keyrings/anydesk.gpg] http://deb.anydesk.com/ all main' | sudo tee /etc/apt/sources.list.d/anydesk.list
Installazione
$ sudo apt update
$ sudo apt install anydesk


AnyDesk su Debian 12

enjoy 🙂

Ansible su Debian 12 e SysLinuxOS

Ansible su Debian 12 e SysLinuxOS

Ansible su Debian 12 e SysLinuxOS


Guida su come installare Ansible su Debian 12 e SysLnuxOS 12. Ansible è un tool di automazione open source che viene utilizzato per automatizzare le attività IT, come la gestione della configurazione, il provisioning, il deployment e l’orchestrazione.

**Alcuni esempi di utilizzo di Ansible**

* Gestione della configurazione di server e macchine virtuali
* Deployment di applicazioni e software
* Orchestrazione di processi IT
* Provisionig di infrastrutture cloud

Installazione

Si può installare tramite apt:

$ sudo apt update
$ sudo apt install ansible -y

oppure tramite pip:

$ sudo apt install python3 python3-pip -y
$ pip install ansible --break-system-packages

in questo ultimo caso il PATH sarà in .local/bin/ansible, quindi:

$ export PATH=$PATH:/home/$USER/.local/bin

per rendere definitiva la modifica inserire il comando in .bashrc. Nel caso non fosse presente:

$ nano ~/.bashrc

ed inserire:

PATH=$PATH:~/bin
export PATH=$PATH:/home/$USER/.local/bin

quindi testare:

$ ansible --version

ansible [core 2.15.5]
config file = None
configured module search path = ['/home/edmond/.ansible/plugins/modules', '/usr/share/ansible/plugins/modules']
ansible python module location = /home/edmond/.local/lib/python3.11/site-packages/ansible
ansible collection location = /home/edmond/.ansible/collections:/usr/share/ansible/collections
executable location = /home/edmond/.local/bin/ansible
python version = 3.11.2 (main, Mar 13 2023, 12:18:29) [GCC 12.2.0] (/usr/bin/python3)
jinja version = 3.1.2
libyaml = True

Ansible deve essere installato su uno dei nodi. Il nodo di gestione è noto come Control Node. Questo nodo avrà il file Ansible Playbook. Questo è un file YAML che contiene i passaggi che l’utente desidera eseguire su una o più macchine normalmente denominate managed nodes.

Prerequisiti

Per questa guida ho usato 3 server:

Esempio ip_address
Control Node (SysLinuxOS 12) 192.168.1.168
Managed Node 1 (server 1 Debian 12) 192.168.1.200
Managed Node 2 (server 2 Raspberry Py OS 12) 192.168.1.251
Creazione Hosts Inventory file

questo file si occuperà del collegamento con i managed node:

$ mkdir ~/project
$ nano  ~/project/hosts

ed inserire ip ed username dei nodi da automatizzare:

[servers]
server1 ansible_host=192.168.1.200 ansible_user=edmond ansible_ssh_port=22
server2 ansible_host=192.168.1.251 ansible_user=edmond ansible_ssh_port=22

dopo se non si ha l’accesso ssh, si va a creare una chiave, che verrà copiata sui 2 server:

Creazione e copia chiave ssh
$ sudo su
# ssh-keygen
# ssh-copy-id root@192.168.1.200
# ssh-copy-id root@192.168.1.25
Utilizzo moduli Ansible

Sintassi:

$ ansible -i <host_file> -m <module> <host>

Dove:

  • -i ~/hosts: contiene la lista degli hosts
  • -m: specifica il modulo come ping,  shell ecc.ecc.
  • <host>: Ansible hosts dove lanciare i moduli

Utilizzare ping usando ansible ping module:

$ ansible -i ~/project/hosts -m ping all

output ping:

edmond@edmondbox:~$ ansible -i ~/project/hosts -m ping all
server2 | SUCCESS => {
"ansible_facts": {
"discovered_interpreter_python": "/usr/bin/python3"
},
"changed": false,
"ping": "pong"
}
server1 | SUCCESS => {
"ansible_facts": {
"discovered_interpreter_python": "/usr/bin/python3"
},
"changed": false,
"ping": "pong"
}

Utilizzo shell usando ansible shell module:

$ ansible -i ~/project/hosts -m shell -a "uptime" all

output uptime:

$ ansible -i ~/project/hosts -m shell -a "uptime" all

server2 | CHANGED | rc=0 >>
19:51:43 up 1 day, 3:00, 1 user, load average: 0.35, 0.11, 0.08
server1 | CHANGED | rc=0 >>
19:51:44 up 3:36, 1 user, load average: 0.00, 0.00, 0.00

output df:

$ ansible -i ~/project/hosts -m shell -a "df -h" all

server1 | CHANGED | rc=0 >>
Filesystem Size Used Avail Use% Mounted on
udev 661M 0 661M 0% /dev
tmpfs 185M 1.8M 184M 1% /run
/dev/mmcblk0p2 117G 8.0G 103G 8% /
tmpfs 925M 0 925M 0% /dev/shm
tmpfs 5.0M 16K 5.0M 1% /run/lock
/dev/mmcblk0p1 510M 61M 450M 12% /boot/firmware
tmpfs 185M 0 185M 0% /run/user/1000
server2 | CHANGED | rc=0 >>
Filesystem Size Used Avail Use% Mounted on
udev 1.6G 0 1.6G 0% /dev
tmpfs 380M 1.2M 379M 1% /run
/dev/mmcblk0p2 59G 11G 45G 19% /
tmpfs 1.9G 0 1.9G 0% /dev/shm
tmpfs 5.0M 16K 5.0M 1% /run/lock
/dev/mmcblk0p1 510M 61M 450M 12% /boot/firmware
tmpfs 380M 0 380M 0% /run/user/1000

output free:

$ ansible -i ~/project/hosts -m shell -a "free -m" all

server1 | CHANGED | rc=0 >>
total used free shared buff/cache available
Mem: 1848 732 126 13 1005 1115
Swap: 99 0 99
server2 | CHANGED | rc=0 >>
total used free shared buff/cache available
Mem: 3793 577 1916 45 1378 3215
Swap: 99 0 99Utilizzo modulo apt
Utilizzo modulo apt

Con il modulo apt, si possono utilizzare i classici comandi di apt update, apt upgrade, apt install ecc ecc. In questo caso useremo playbook.yaml.

1) apt update, apt upgrade, e in caso di nuovo kernel, reboot

$ nano ~/project/upgrade.yml

inserire:

---
- hosts: servers
become: yes
become_user: root
tasks:
- name: Update apt repo and cache on all Debian boxes
apt: update_cache=yes force_apt_get=yes cache_valid_time=3600

- name: Upgrade all packages on servers
apt: upgrade=dist force_apt_get=yes

- name: Check if a reboot is needed on all servers
register: reboot_required_file
stat: path=/var/run/reboot-required get_md5=no

- name: Reboot the box if kernel updated
reboot:
msg: "Reboot initiated by Ansible for kernel updates"
connect_timeout: 5
reboot_timeout: 300
pre_reboot_delay: 0
post_reboot_delay: 30
test_command: uptime
when: reboot_required_file.stat.exists

comando apt upgrade:

$ ansible-playbook project/upgrade.yml -i project/hosts

output:

BECOME password:

PLAY [servers] *****************************************************************

TASK [Gathering Facts] *********************************************************
ok: [server2]
ok: [server1]

TASK [Update apt repo and cache on all Debian boxes] ***************************
changed: [server2]
changed: [server1]

TASK [Upgrade all packages on servers] *****************************************
ok: [server2]
ok: [server1]

TASK [Check if a reboot is needed on all servers] ******************************
ok: [server2]
ok: [server1]

TASK [Reboot the box if kernel updated] ****************************************
skipping: [server1]
skipping: [server2]

PLAY RECAP *********************************************************************
server1 : ok=4 changed=1 unreachable=0 failed=0 skipped=1 rescued=0 ignored=0 
server2 : ok=4 changed=1 unreachable=0 failed=0 skipped=1 rescued=0 ignored=0

2) Installazione singolo pacchetto bc

$ nano ~/project/package.yml

inserire:

- hosts: all
become: yes
tasks:
- name : Install the latest bc package
apt: name=bc state=latest update_cache=true

comando con opzione -K per eseguire il comando da root:

$ ansible-playbook project/package.yml -i project/hosts -K

output:

PLAY [all] *********************************************************************

TASK [Gathering Facts] *********************************************************
ok: [server2]
ok: [server1]

TASK [Install the latest bc package] *******************************************
changed: [server2]
changed: [server1]

PLAY RECAP *********************************************************************
server1 : ok=2 changed=1 unreachable=0 failed=0 skipped=0 rescued=0 ignored=0 
server2 : ok=2 changed=1 unreachable=0 failed=0 skipped=0 rescued=0 ignored=0

3) Installazione pacchetto 7zip con output debug managed nodes

$ nano ~/project/output.yml

inserire:

- hosts: all
become: yes
tasks:
- name: Capture the Output
apt: name=7zip state=present update_cache=true
register: apt_output
- debug: var=apt_output

comando:

$ ansible-playbook project/output.yml -i project/hosts -K

output:

 "(Reading database ... 65%",
"(Reading database ... 70%",
"(Reading database ... 75%",
"(Reading database ... 80%",
"(Reading database ... 85%",
"(Reading database ... 90%",
"(Reading database ... 95%",
"(Reading database ... 100%",
"(Reading database ... 76140 files and directories currently installed.)",
"Preparing to unpack .../7zip_22.01+dfsg-8_arm64.deb ...",
"Unpacking 7zip (22.01+dfsg-8) ...",
"Setting up 7zip (22.01+dfsg-8) ...",
"Processing triggers for man-db (2.11.2-2) ..."

4) Installazione multipla e verifica pacchetti installati

$ nano ~/project/packages.yml

inserire:

---
- hosts: all
become: yes
tasks:
- name: Update apt cache and make sure Wget, Curl and Terminator are installed
apt:
name: "{{ item }}"
update_cache: yes
loop:
- wget
- curl
- terminator

comando:

$ ansible-playbook project/packeges.yml -i project/hosts -K

output:

PLAY [all] *********************************************************************

TASK [Gathering Facts] *********************************************************
ok: [server2]
ok: [server1]

TASK [Update apt cache and make sure Wget, Curl and Terminator are installed] ***
ok: [server2] => (item=wget)
ok: [server1] => (item=wget)
ok: [server2] => (item=curl)
ok: [server1] => (item=curl)
changed: [server2] => (item=terminator)
changed: [server1] => (item=terminator)

PLAY RECAP *********************************************************************
server1 : ok=2 changed=1 unreachable=0 failed=0 skipped=0 rescued=0 ignored=0 
server2 : ok=2 changed=1 unreachable=0 failed=0 skipped=0 rescued=0 ignored=0

come si può notare i pacchetti wget e curl sono presenti su entrambi i server, mentre terminator viene invece installato.


Ansible su Debian 12 e SysLinuxOS

enjoy 😉

Installazione Nextcloud 27 su Raspberry pi 4

Installazione Nextcloud 27 su Raspberry pi 4

Installazione Nextcloud 27 su Raspberry pi 4


UPDATE: 14/10/23

con la versione bookworm, php8.2 è gia incluso.

Guida su come installare Nextcloud 27 su Raspberry pi 4. Per installare Nextcloud a differenza delle versioni precedenti è indispensabile avere php8.2

Nota: Assicurati di avere un Raspberry Pi 4 funzionante con Raspberry pi OS al momento bullseye.

1) Aggiornare il sistema:
$ sudo apt update
$ sudo apt upgrade -y
$ sudo reboot
2) Aggiungere i repository per ottenere le ultime versioni di php:
$ curl https://packages.sury.org/php/apt.gpg | sudo tee /usr/share/keyrings/suryphp-archive-keyring.gpg >/dev/null
$ echo "deb [signed-by=/usr/share/keyrings/suryphp-archive-keyring.gpg] https://packages.sury.org/php/ $(lsb_release -cs) main" | sudo tee /etc/apt/sources.list.d/sury-php.list
$ sudo apt update; sudo apt upgrade -y
3) Installazione di Apache2, Mysql, php8.2, certbot:
$ sudo apt install apache2 php8.2 php8.2-gd php8.2-sqlite3 php8.2-curl php8.2-zip php8.2-xml php8.2-mbstring php8.2-mysql php8.2-bz2 php8.2-intl php8.2-imap php8.2-gmp libapache2-mod-php8.2 mariadb-server python3-certbot-apache php8.2-fpm php8.2-apcu php8.2-imagick php8.2-bcmath libmagickcore-6.q16-6-extra ffmpeg redis-server php8.2-redis
4) Verifica Apache2
$ sudo a2enmod proxy_fcgi setenvif
$ sudo a2enconf php8.2-fpm
$ sudo systemctl restart apache2
$ sudo systemctl status apache2
5) Creazione utente nextcloud e db
$ sudo mysql -u root -p

ed invio

create database nextcloud_db;
create user nextclouduser@localhost identified by 'YOUR-STRONG-PWD';
grant all privileges on nextcloud_db.* to nextclouduser@localhost identified by 'YOU-STRONG-PWD';
flush privileges;
exit;
6) Download Nextcloud
$ cd /var/www/
$ sudo wget -v https://download.nextcloud.com/server/releases/latest.zip
$ sudo unzip latest.zip
$ sudo rm latest.zip

creazione  della directory di storage, quest’ultima può essere creata anche all’esterno della cartella Nextcloud o su unità esterna.

$ sudo mkdir -p /var/www/nextcloud/data
$ sudo chown -R www-data:www-data /var/www/nextcloud/
$ sudo chmod 750 /var/www/nextcloud/data
7) Configurazione Apache2
$ sudo nano /etc/apache2/sites-available/nextcloud.conf

ed incollare questa semplice configurazione, che punterà a [IPADDRESS]/nextcloud

Alias /nextcloud "/var/www/nextcloud/"

<Directory /var/www/nextcloud/>
Require all granted
AllowOverride All
Options FollowSymLinks MultiViews

<IfModule mod_dav.c>
Dav off
</IfModule>

</Directory>
$ sudo a2ensite nextcloud.conf
$ sudo systemctl reload apache2

se si volesse utilizzare invece un proprio dominio:

<VirtualHost *:80>
DocumentRoot /var/www/nextcloud/
ServerName your.domain.com

<Directory /var/www/nextcloud/>
Require all granted
AllowOverride All
Options FollowSymLinks MultiViews

<IfModule mod_dav.c>
Dav off
</IfModule>
</Directory>
</VirtualHost>
$ sudo a2ensite nextcloud.conf
$ sudo systemctl reload apache2
8) Nextcloud installazione e post installazione


Nextcloud Server su Raspberry Piandare all’indirizzo del server: [IPADDRESS]/nextcloud

$ hostname -I

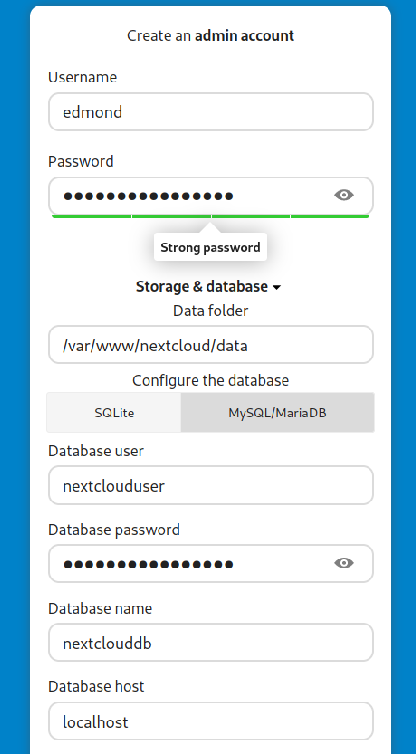
creare username e password per l’accesso via web, e poi inserire nextclouduser e nextcloud_db. I dati di default saranno in /var/www/nextcloud/data, ma si possono anche spostare successivamente.

9) Problemi accesso al server Nextcloud

se non si accede più al server andare a verificare i 2 files principali di apache2, 000-default.conf e default-ssl.conf, che puntano alla directory sbagliata:

$ sudo nano /etc/apache2/sites-available/000-default.conf
$ sudo nano /etc/apache2/sites-available/default-ssl.conf

da

DocumentRoot /var/www/html

a

DocumentRoot /var/www/
10) Tuning Apache2

alcune essenziali modifiche:

$ sudo nano /etc/php/8.2/fpm/php.ini

trovare queste tre stringhe e modificarle da così:

memory_limit = 128M
post_max_size = 8M
upload_max_filesize = 2M

a così:

memory_limit = 1024M
post_max_size = 1024M
upload_max_filesize = 1024M
$ sudo systemctl restart apache2
$ sudo systemctl restart php8.2-fpm.service

Modificare anche le porte, come sotto:

$ sudo nano /etc/apache2/ports.conf
Listen 0.0.0.0:80

<IfModule ssl_module>
Listen 0.0.0.0:443
</IfModule>

<IfModule mod_gnutls.c>
Listen 443
</IfModule>
$ sudo systemctl restart apache2
11) Certificato SSL auto-firmato

nell’esempio sotto, userò un certificato auto-firmato, ma è consigliato un certificato del tipo  Let’s Encrypt (vedi capitolo 12)

$ sudo mkdir -p /etc/apache2/ssl
£ sudo openssl req -x509 -nodes -days 365 -newkey rsa:4096 -keyout /etc/apache2/ssl/apache.key -out /etc/apache2/ssl/apache.crt
$ sudo a2enmod ssl
$ sudo systemctl restart apache2

inserire i dati per la creazione del certificato:

Country Name (2 letter code) [AU]:
State or Province Name (full name) [Some-State]:
Locality Name (eg, city) []:
Organization Name (eg, company) [Internet Widgits Pty Ltd]:
Organizational Unit Name (eg, section) []:
Common Name (e.g. server FQDN or YOUR name) []:
Email Address []:

poi trovare queste due stringhe:

$ sudo nano /etc/apache2/sites-available/default-ssl.conf

e modificarle da così:

SSLCertificateFile /etc/ssl/certs/ssl-cert-snakeoil.pem
SSLCertificateKeyFile /etc/ssl/private/ssl-cert-snakeoil.key

a così:

SSLCertificateFile /etc/apache2/ssl/apache.crt
SSLCertificateKeyFile /etc/apache2/ssl/apache.key
$ sudo a2ensite default-ssl.conf
$ sudo systemctl reload apache2
12) Installazione certificato con Let’s Encrypt
  • Il raspberry dovrà avere come dominio/hostname l’equivalente di example.com. Questo può essere modificato in /etc/hostname e poi riavviare.
  • Il vostro ip pubblico dovrà puntare quindi al dominio, nel caso non si avesse un ip pubblico, utilizzare un servizio di DNS.
  • Assicurarsi prima, di aprire la porte 80  verso il proprio server, altrimenti non si potranno ottenere i certificati. Successivamente bisognerà aprire la 443.

con certbot già installato in precedenza basta:

$ sudo certbot --webroot -w /var/www/nextcloud -i apache --agree-tos --redirect --hsts --staple-ocsp --email your@mail.com -d server.example.com

se tutto è andato bene vedremo:

IMPORTANT NOTES:
- Congratulations! Your certificate and chain have been saved at:
/etc/letsencrypt/live/example.com/fullchain.pem
Your key file has been saved at:
/etc/letsencrypt/live/example.com/privkey.pem
Your cert will expire on 2021-03-07. To obtain a new or tweaked
version of this certificate in the future, simply run certbot
again. To non-interactively renew *all* of your certificates, run
"certbot renew"
- If you like Certbot, please consider supporting our work by:

Donating to ISRG / Let's Encrypt: https://letsencrypt.org/donate
Donating to EFF: https://eff.org/donate-le

affinchè il server sia sempre raggiungibile a [IPADDRESS]/nextcloud  verificare che sia presente la stringa <Alias /nextcloud “/var/www/nextcloud/”>

$ sudo nano /etc/apache2/sites-available/nextcloud.conf

come sotto:

Alias /nextcloud "/var/www/nextcloud/"
<VirtualHost *:80>
DocumentRoot /var/www/nextcloud/
ServerName server.example.com
13) Sicurezza

13.1) Installazione e configurazione firewall ufw:

$ sudo apt install ufw
$ sudo ufw enable

bloccare tutte le connessioni in ingresso:

$ sudo ufw default allow outgoing
$ sudo ufw default deny incoming

aprire solo le porte interessate, come quella ssh o https, ad ogni modo mai utilizzare porte standard:

$ sudo ufw allow 22
$ sudo ufw allow 443/tcp
$ sudo ufw allow 80/tcp

verifica:

$ sudo ufw status verbose
$ sudo iptables -S

13.2) Installazione e configurazione fail2ban:

$ sudo apt install fail2ban
$ sudo systemctl enable fail2ban
$ sudo systemctl status fail2ban

proteggere tutti i servizi usati, utilizzando /etc/fail2ban/jail.local, fail2ban arriva già con dei filtri predefiniti che possono essere abilitati:

$ ls /etc/fail2ban/filter.d/

quindi:

$ sudo cp /etc/fail2ban/jail.conf /etc/fail2ban/jail.local
$ sudo nano /etc/fail2ban/jail.local

dove si trovano gia i filtri che si possono abilitare con “enabled = true

esempio:

[sshd]
enabled = true
port = 22
filter = sshd
logpath = /var/log/auth.log
maxretry = 3
bantime = 120
ignoreip = whitelist-IP

# detect password authentication failures
[apache]
enabled = true
port = http,https
filter = apache-auth
logpath = /var/log/apache*/*error.log
maxretry = 6

# detect potential search for exploits and php vulnerabilities
[apache-noscript]
enabled = true
port = http,https
filter = apache-noscript
logpath = /var/log/apache*/*error.log
maxretry = 6

# detect Apache overflow attempts
[apache-overflows]
enabled = true
port = http,https
filter = apache-overflows
logpath = /var/log/apache*/*error.log
maxretry = 2

# detect failures to find a home directory on a server
[apache-nohome]
enabled = true
port = http,https
filter = apache-nohome
logpath = /var/log/apache*/*error.log
maxretry = 2
$ sudo systemctl restart fail2ban 
$ sudo fail2ban-client status

13.3) Integrazione Nextcloud in fail2ban:

$ sudo nano /etc/fail2ban/filter.d/nextcloud.conf

ed inserire il codice sotto:

[Definition]
_groupsre = (?:(?:,?\s*"\w+":(?:"[^"]+"|\w+))*)
failregex = ^\{%(_groupsre)s,?\s*"remoteAddr":"<HOST>"%(_groupsre)s,?\s*"messag>
^\{%(_groupsre)s,?\s*"remoteAddr":"<HOST>"%(_groupsre)s,?\s*"messag>
datepattern = ,?\s*"time"\s*:\s*"%%Y-%%m-%%d[T ]%%H:%%M:%%S(%%z)?"

a questo punto inserire nella sezione Jail il filtro specifico per Nextcloud:

$ sudo nano /etc/fail2ban/jail.local

ed inserire:

[nextcloud]
backend = auto
enabled = true
port = 80,443
protocol = tcp
filter = nextcloud
maxretry = 3
bantime = 86400
findtime = 43200
logpath = /var/www/nextcloud/data/nextcloud.log

verifica con:

$ sudo systemctl restart fail2ban
$ sudo fail2ban-client status nextcloud

errore avvio fail2ban:

$ sudo nano /etc/fail2ban/jail.local

ed impostare:

backend = systemd
14) Trusted Domain

indicare solo gli ip ed i domini che possono accedere:

$ sudo nano /var/www/nextcloud/config/config.php
'trusted_domains' => 
array (
0 => '192.168.1.122',
1 => 'my-domain.com',
15) Abilitare Memory Caching, Redis e default phone region
$ sudo nano /var/www/nextcloud/config/config.php

ed inserire prima della voce trusted_domains

'memcache.local' => '\OC\Memcache\APCu',

poi inserire dopo la voce installed’ => true

'memcache.local' => '\OC\Memcache\APCu',
'memcache.locking' => '\OC\Memcache\Redis',
'memcache.distributed' => '\OC\Memcache\Redis',
'redis' => [
'host' => 'localhost',
'port' => 6379,
],

e a seguire:

'default_phone_region' => 'IT',
16) Background Job

nextcloud richiede un cronjob per allegerire il carico, di default è settato in AJAX, andare nel menu Basic Settings ed impostare a cron:

Background Job

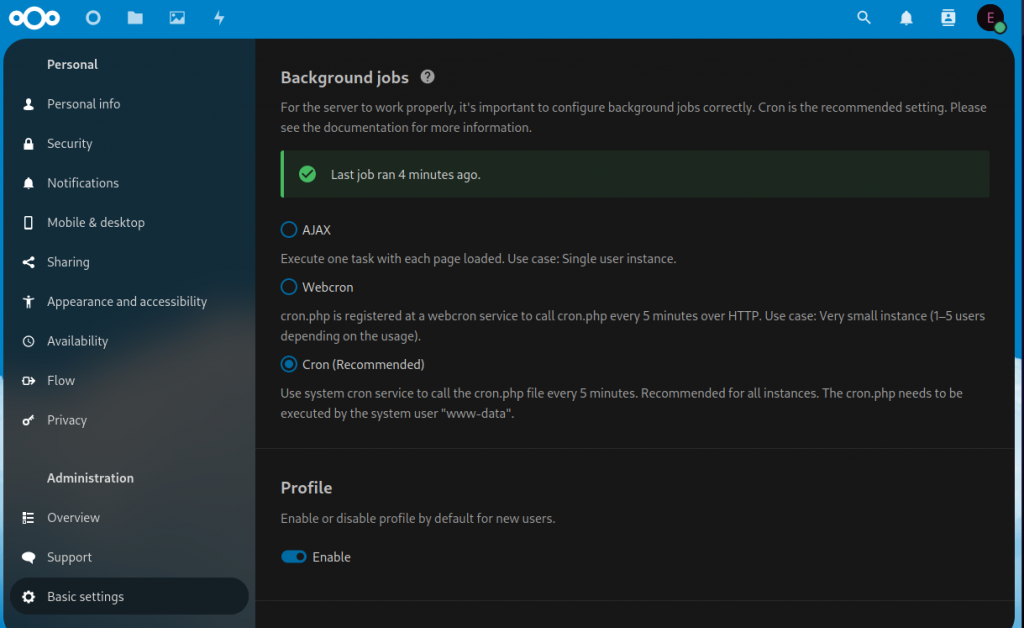
poi creare un crob job che parte in backgroung ogni 5 minuti:

$ sudo crontab -u www-data -e

ed inserire in fondo:

*/5 * * * * php8.2 --define apc.enable_cli=1 /var/www/nextcloud/cron.php

verificare con:

$ sudo crontab -u www-data -l
17) Forzare la connessione via SSL con certificato auto-firmato
$ sudo nano /etc/apache2/sites-available/000-default.conf

sostituire tutto con quello sotto, che reindirizza tutte le richieste a https:

Alias /nextcloud "/var/www/nextcloud/"

<VirtualHost *:80>
ServerAdmin admin@example

RewriteEngine On
RewriteCond %{HTTPS} off
RewriteRule ^(.*)$ https://%{HTTP_HOST}$1 [R=301,L]
</VirtualHost>
18) Aggiornamenti di sicurezza automatici giornalieri:
$ sudo apt install unattended-upgrades
$ sudo nano /etc/apt/apt.conf.d/02periodic

inserire:

APT::Periodic::Enable "1";
APT::Periodic::Update-Package-Lists "1";
APT::Periodic::Download-Upgradeable-Packages "1";
APT::Periodic::Unattended-Upgrade "1";
APT::Periodic::AutocleanInterval "1";
APT::Periodic::Verbose "2";

aggiornare:

$ sudo unattended-upgrades -d
19) Sudo DEVE sempre chiedere la password:
$ sudo nano /etc/sudoers.d/010_pi-nopasswd

diventa da così:

YOUR-USER ALL=(ALL) NOPASSWD: ALL

a così:

YOUR-USER ALL=(ALL) PASSWD: ALL
20) Mysql in sicurezza
$ sudo mysql_secure_installation
Enter current password for root (enter for none): Press Enter
Set root password? [Y/n] Y 
Remove anonymous users? [Y/n] Y 
Disallow root login remotely? [Y/n] Y 
Remove test database and access to it? [Y/n] Y 
Reload privilege tables now? [Y/n] Y
21) SSH in sicurezza

cambiare subito la porta di default e verificare che non sia abilitato il login come root, ma soprattutto usare una chiave ssh:

$ sudo nano /etc/ssh/sshd_config
#PermitRootLogin prohibit-password
Port 2223
22) Backup

backup da eseguire periodicamente su supporti esterni ed in remoto. Si può utilizzare rsync (guida), tar (guida), dd (guida), scp (guida), lsyncd (guida).

23) VPN

il sistema più sicuro per accedere da remoto è tramite vpn, se si ha un router che supporta ipSec o Wireguard (fritzbox 7590) il tutto è semplice, in alternativa si può creare un server vpn, utilizzando openvpn o wireguard


Installazione Nextcloud 27 su Raspberry pi 4

enjoy 😉


SysLinuxOS 12 for System Integrators rilasciato

SysLinuxOS 12 for System Integrators

SysLinuxOS 12 for System Integrators

Dopo il nuovo rilascio di Debian 12 Bookworm, arriva anche SysLinuxOS 12 (for System Integrators). In questa versione ci sono diversi miglioramenti e nuove features che la differenziano da Debian 12, alcune sono nascoste sotto il cofano. SyslinuxOS 12 arriva subito con Mate desktop environment come desktop principale, mentre la versione con Gnome verrà rilasciata successivamente.

Features principali:
  • Kernel 6.3.8 stable
  • OS-Prober abilitato di default, a differenza di Debian 12, utile per il riconoscimento degli altri OS già installati.
  • Interfacce di rete riconosciute di default come eth0, wlan0, per semplificare  la gestione delle stesse. In più sono presenti altre differenze nascoste, che verranno approfondite successivamente.
Desktop:

Per quanto riguarda la parte estetica, sono stati integrati/modificato due conky, tra cui auzia, che oltre ad abbellire il desktop, sono utili per vedere le prestazioni del pc, della rete, compreso indirizzamento ip privato ed ip pubblico, oltre ai vari processi in esecuzione. In più il menu è ordinato in base all’utilità dei programmi. C’è anche un nuovo menu chiamato Networking che racchiude gli strumenti per l’analisi della rete. Questi strumenti sono solo quelli che utilizzano la Gui, tutti gli altri sono presenti da riga di comando. Mate si offre proriamente per un ambiente semplice, ordinato e veloce.

Sicurezza:

Presenti di default vari firewall, oltre Gufw e Firewalld, anche Opensnitch, Shorewall. Inoltre è presente Suricata come Intrusion Prevention System (IPS). Firejail, Firetools, Firewalk e molto altro.

Networking:

Packet Tracer 8.2.1, ed in alternativa è presente GNS3. Inserito Sparrow Wifi, Presente Virtualbox 7.0.2, ed inoltre sotto il cofano sono presenti tutti i tools di scansione e testing delle reti.

Monitoring:

Inseriti Cacti, Fail2ban, Icinga, Monit, Munin, Nagios4, Zabbix-Agent2 e Zabbix-Fronted, più molto altro.

Conclusione:

SysLinuxOS 12 (for System Integrators) offre un sistema operativo robusto e ricco di funzionalità, progettato specificamente per i professionisti. Con il suo desktop migliorato, misure di sicurezza migliorate, funzionalità di rete avanzate e strumenti di monitoraggio completi, SysLinuxOS 12 offre una piattaforma affidabile ed efficiente per le attività di networking.

SysLinuxOS 12 for System Integrators

enjoy 😉


Cambiare nome interfaccia di rete a eth0 su Debian 12

Cambiare nome interfaccia di rete a eth0 su Debian 12


Cambiare nome interfaccia di rete a eth0 su Debian 12

Guida su come cambiare il nome alle interfaccia di rete a eth0/wlan0, su Debian 11/12 e SysLinuxOS in modo permanente, utilizzando systemd-networkd. Attualmente vengono riconosciute con molteplici nomi, anche abbastanza lunghi e difficili da ricordare. Questi sono assegnati alle interfacce di rete direttamente dal kernel. Ma tutti questi nomi hanno in comune le due iniziali, “en” ” wl”, infatti se si digita il comando:

sudo dmesg | grep -i eth
sudo dmesg | grep -i wl

si può leggere che le interfacce vengono rinominate partendo da eth0 e wlan0. Personalmente conosco due modi funzionanti per ritornare al vecchio standard.

Metodo 1

questo modo dovrebbe funzionare nella maggior parte dei casi e si limita a fare una piccola aggiunta a grub:

sudo nano /etc/default/grub

ed aggiungere

GRUB_CMDLINE_LINUX="net.ifnames=0 biosdevname=0"

come sotto:

GRUB_DEFAULT=0
GRUB_TIMEOUT=5
GRUB_DISTRIBUTOR=`lsb_release -i -s 2> /dev/null || echo Debian`
GRUB_CMDLINE_LINUX_DEFAULT="quiet"
GRUB_CMDLINE_LINUX="net.ifnames=0 biosdevname=0"

generare un nuovo file di configurazione di grub, e riavviare.

sudo grub-mkconfig -o /boot/grub/grub.cfg
sudo reboot

se tutto è andato bene le interfacce saranno eth0 e wlan0. Se si usa il dhcp non c’è bisogno di modificare nulla, in caso di ip statico, si utilizza il solito metodo:

sudo nano /etc/network/interfaces
auto eth0
iface eth0 inet static
address 192.168.1.100
netmask 255.255.255.0
dns-nameservers 192.168.1.1
gateway 192.168.1.1
Metodo 2

questo metodo da utilizzare in alternativa al primo, consiste nell’andare a trovare i nomi ed i percorsi delle attuali schede di rete, per poi manualmente creare due file che conterranno i nuovi nomi.

sudo udevadm info /sys/class/net/nome_interfaccia

il comando sopra ci trova i dati che ci interessano:

E: ID_PATH=pci-0000:03:00.0
E: ID_PATH_TAG=pci-0000_03_00_0

di conseguenza potremo creare il file manualmente:

sudo nano /etc/systemd/network/10-rename-nome_interfaccia

ed aggiungere come esempio sotto

per eth0:

[Match]
Path=pci-0000:03:00.0
pci-0000_03_00_0
[Link]
Name=eth0

o questo per wlan0

[Match]
Path=pci-0000:05:00.0
pci-0000_05_00_0
[Link]
Name=wlan0

dopo il riavvio il nome delle interfacce di rete saranno viste permanentemente con il vecchio standard. In realtà ci sarebbe anche un altro metodo, più semplice 🙂 e cioè uno script bash che fa tutto da solo:

Metodo semplice

sempre in alternativa al primo

git clone https://github.com/fconidi/rename-interfaces.git
cd rename-interfaces/
chmod +x rename-interfaces.sh
sudo ./rename-interfaces.sh
sudo reboot

Cambiare nome interfaccia di rete a eth0 su Debian 12

enjoy 😉