Onedrive su Debian 10 con rclone

Onedrive su Debian 10 con rcloneOnedrive su Debian 10 con rclone

Guida su come connettere il proprio account OneDrive, da linea di comando, utilizzando rclone.

Installazione di rclone:

$ sudo apt install rclone fuse

Configurazione:

$ rclone config

output:

edmond@edmondbox:~$ rclone config
2020/05/25 18:25:55 NOTICE: Config file "/home/edmond/.config/rclone/rclone.conf" not found - using defaults
No remotes found - make a new one
n) New remote
s) Set configuration password
q) Quit config
n/s/q> n
name> myonedrive
Type of storage to configure.
Enter a string value. Press Enter for the default ("").
Choose a number from below, or type in your own value
1 / A stackable unification remote, which can appear to merge the contents of several remotes
\ "union"
2 / Alias for a existing remote
\ "alias"
3 / Amazon Drive
\ "amazon cloud drive"
4 / Amazon S3 Compliant Storage Providers (AWS, Ceph, Dreamhost, IBM COS, Minio)
\ "s3"
5 / Backblaze B2
\ "b2"
6 / Box
\ "box"
7 / Cache a remote
\ "cache"
8 / Dropbox
\ "dropbox"
9 / Encrypt/Decrypt a remote
\ "crypt"
10 / FTP Connection
\ "ftp"
11 / Google Cloud Storage (this is not Google Drive)
\ "google cloud storage"
12 / Google Drive
\ "drive"
13 / Hubic
\ "hubic"
14 / JottaCloud
\ "jottacloud"
15 / Local Disk
\ "local"
16 / Microsoft Azure Blob Storage
\ "azureblob"
17 / Microsoft OneDrive
\ "onedrive"
18 / OpenDrive
\ "opendrive"
19 / Openstack Swift (Rackspace Cloud Files, Memset Memstore, OVH)
\ "swift"
20 / Pcloud
\ "pcloud"
21 / SSH/SFTP Connection
\ "sftp"
22 / Webdav
\ "webdav"
23 / Yandex Disk
\ "yandex"
24 / http Connection
\ "http"
Storage> 17
** See help for onedrive backend at: https://rclone.org/onedrive/ **

Microsoft App Client Id
Leave blank normally.
Enter a string value. Press Enter for the default ("").
client_id>
Microsoft App Client Secret
Leave blank normally.
Enter a string value. Press Enter for the default ("").
client_secret>
Edit advanced config? (y/n)
y) Yes
n) No
y/n> n
Remote config
Use auto config?
* Say Y if not sure
* Say N if you are working on a remote or headless machine
y) Yes
n) No
y/n> y
If your browser doesn't open automatically go to the following link: http://127.0.0.1:53682/auth
Log in and authorize rclone for access
Waiting for code...
Got code

Autorizzare rclone come app sicura:

Onedrive su Debian 10 con rclone

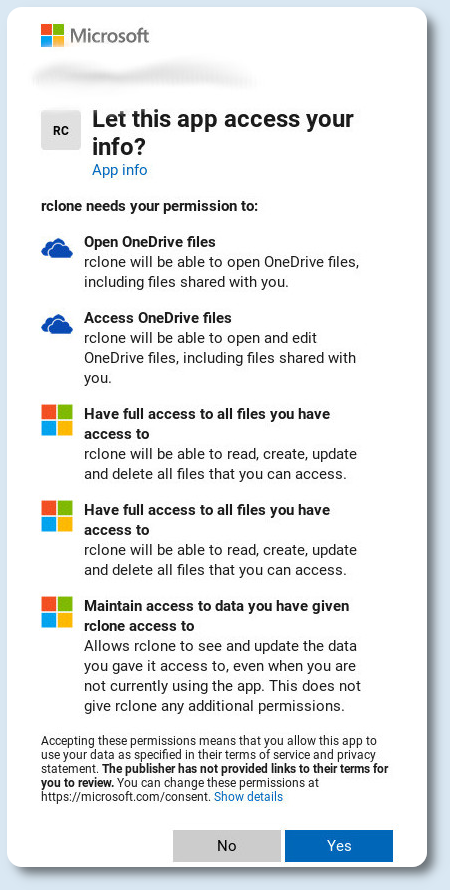
Choose a number from below, or type in an existing value
1 / OneDrive Personal or Business
\ "onedrive"
2 / Root Sharepoint site
\ "sharepoint"
3 / Type in driveID
\ "driveid"
4 / Type in SiteID
\ "siteid"
5 / Search a Sharepoint site
\ "search"
Your choice> 1
Found 1 drives, please select the one you want to use:
0: (personal) id=72593143d3aac403
Chose drive to use:> 0
Found drive 'root' of type 'personal', URL: https://onedrive.live.com/?cid=72593143d3aac403
Is that okay?
y) Yes
n) No
y/n> y
--------------------
[myonedrive]
token = {"access_token":"EwBoA8l6BAAUO9chh8cJscQLmU+LSWpbnr0vmwwAAcTsM8GrYTxDxI5BKZdaB","expiry":"2020-05-25T19:26:56.661526715+02:00"}
drive_id = 72593143d3aac403
drive_type = personal
--------------------
y) Yes this is OK
e) Edit this remote
d) Delete this remote
y/e/d> y
Current remotes:

Name Type
==== ====
myonedrive onedrive

e) Edit existing remote
n) New remote
d) Delete remote
r) Rename remote
c) Copy remote
s) Set configuration password
q) Quit config
e/n/d/r/c/s/q> q
edmond@edmondbox:~$

creazione punto di mount e montaggio utilizzando fuse:

$ mkdir ~/onedrive
$ rclone mount --daemon --vfs-cache-mode writes myonedrive: ~/onedrive

al posto di writes si può utilizzare full, per scaricare tutto in locale. La locazione del file di configurazione si trova col comando:

$ rclone config file

Come alternativa esiste il pacchetto deb di OneDrive che si trova in Debian Sid, ma che io non ho testato.

Onedrive su Debian 10 con rclone

enjoy 😉

Server Cloud WebDav su Raspberry pi 2 e Debian Jessie

Server WebDav su Raspberry pi 2


Per avere un proprio Server Cloud WebDav su Raspberry pi 2 e Debian Jessie, da utilizzare sia in locale che da remoto, alla stregua di Dropbox, Box.com, OneDrive ecc ecc, i passi da seguire sono i seguenti:

sudo apt-get install apache2
sudo a2enmod dav_fs
sudo a2enmod auth_digest
sudo service apache2 restart
sudo mkdir -p /webdav
sudo chown www-data /webdav
sudo cp /etc/apache2/sites-available/000-default.conf /etc/apache2/sites-available/000-default.conf_bak
sudo nano /etc/apache2/sites-available/000-default.conf

che deve essere come sotto, inserendo al posto delle xxx.xxx.x.x, l' IP del Raspberry:

<VirtualHost xxx.xxx.x.x:80>
        ServerAdmin webmaster@localhost

        DocumentRoot /webdav
        <Directory /webdav>
                Options Indexes MultiViews
                AllowOverride None
                Order allow,deny
                allow from all
        </Directory>

        Alias /webdav /webdav

        <Location /webdav>
           DAV On
           AuthType Basic
           AuthName "webdav"
           AuthUserFile /webdav/passwd.dav
           Require valid-user
       </Location>
</VirtualHost>


sudo service apache2 restart
sudo htpasswd -c /webdav/passwd.dav nome_utente_Raspberry

per chi deve accedere da Windows al server WebDav:

sudo htpasswd /webdav/passwd.dav xxx.xxx.x.x\\nome_utente_Raspberry

poi:

sudo chown root:www-data /webdav/passwd.dav
sudo chmod 640 /webdav/passwd.dav
sudo service apache2 restart

Il server sarà raggiungibile all'indirizzo https://ip_server/webdav

Adesso un minimo di protezione per il nostro server cloud installando Fail2ban, così da bloccare dopo 3 tentativi l'IP di che tenta di accedere senza le giuste credenziali:

sudo apt-get install fail2ban
sudo nano /etc/fail2ban/jail.local

ed inserire:

[apache]
enabled  = true
port     = https,https
filter   = apache-auth
logpath  = /var/log/apache*/*error.log
maxretry = 6

[apache-noscript]
enabled  = true
port     = https,https
filter   = apache-noscript
logpath  = /var/log/apache*/*error.log
maxretry = 6

[apache-overflows]
enabled  = true
port     = https,https
filter   = apache-overflows
logpath  = /var/log/apache*/*error.log
maxretry = 2

[apache-nohome]
enabled  = true
port     = https,https
filter   = apache-nohome
logpath  = /var/log/apache*/*error.log
maxretry = 2

riavviare fail2ban:

sudo service fail2ban restart

adesso siamo pronti ad utilizzare il nostro server cloud.


enjoy 😉


Caja-Dropbox su Debian Wheezy


Per chi usa Dropbox ed ha come desktop-enviroment Mate, può usare caja-dropbox:


$ sudo apt-get install libcaja-extension-dev
$ wget https://github.com/mate-desktop/caja-dropbox/archive/master.zip
$ unzip master.zip
$ cd caja-dropbox-master/
$ ./autogen.sh
$ make -j4
$ sudo make install
$ killall caja


a questo punto si potrà avviare caja-dropbox dal menu, e se non appare riloggarsi.


Integrare Box.com in Debian Gnu/Linux


Per chi usa Box.com come spazio hosting per i propri file, può essere utile integrarlo con la nostra Linuxbox, per avere a portata di mano i files e poterne caricare subito degli altri. Mentre chi utilizza Dropbox non ha problemi, e può installare dai repository nautilus-dropbox, per Box.com bisogna al momento sbattersi di più per l'integrazione. I passi da eseguire sono i seguenti:


$ sudo apt-get install davfs2
$ mkdir ~/box.com
$ mkdir ~/.davfs2/
$ sudo cp /etc/davfs2/davfs2.conf ~/.davfs2/
$ sudo cp /etc/davfs2/secrets ~/.davfs2/
$ sudo chown -R edmond ~/.davfs2/
$ sudo adduser edmond davfs2


(sostituire edmond col vostro nome utente) editare i due files in ~/.davfs2/ , nel file davfs2.conf cambiare la voce:


#use_locks 1


in:
 

use_locks 0


nel file secrets aggiungere indirizzo mail e password per l'accesso a Box.com


indirizzo@mail.com password


modificare /etc/fstab per il montaggio della cartella:


$ sudo nano /etc/fstab


ed aggiungere:


/home/edmond/box.com davfs rw,user,noauto 0 0


(sostituire edmond col vostro nome utente) per cocludere:


$ sudo chmod u+s /sbin/mount.davfs

$ sudo mount ~/box.com


se tutto è andato bene, inserire mail e password di accesso a Box.com, e provare a copiare un file nella cartella, da riga di comando.


enjoy 😉
 

Script "Invia a Dropbox"


Nel menu di Nautilus manca la voce relativa a Dropbox, quindi ho pensato a 3 semplici script che puntano alla cartella Dropbox e relative sottocartelle Photos, Private e Public. Siccome i 3 script sono uguali e quello che cambia è il nome affidatogli ed il percorso delle sottocartelle, posto solo 1 esempio.


$ nano foto-dropbox


ed incollare dentro:


#!/bin/bash
# inviare files nella cartella foto di Dropbox

cp -r $NAUTILUS_SCRIPT_SELECTED_FILE_PATHS /Percorso_Dropbox/Photos


poi:


$ chmod +x foto-dropbox

$ cp ~/.gnome2/nautilus-scripts/

$ killal nautilus


adesso siamo pronti ad inviare i file a Dropbox direttamente da Nautilus, dall'interno del menu Script.


enjoy 😉

Dropbox arriva ufficialmente nei repo Debian


Ho appena letto la notiiza che Dropbox entra ufficialmente nei repo Debian, e tra qualche giorno sarà disponibile in Sid. Nel mio repository personale si trovava già da tempo questo pacchetto, ma dal momento che ci saranno quelli ufficiali, sarò felice di eliminarlo 🙂 Nel frattempo buon download:


enjoy 😉

Repository Dropbox per Debian Squeeze


Dato che nei repository ufficiali Debian, Dropbox non è presente, volevo segnalare che nel mio Repository, sono presenti le versioni amd64 ed i386 di nautilus-dropbox_0.6.7-1. Sperando sia di gradimento 🙂


#### Edmond's repository
deb https://www.edmondweblog.com/repo/ binary/


enjoy 😉