Connessione wifi da terminale via nmcli

Connessione wifi da terminale via nmcli

Connessione wifi da terminale via nmcli

Come configurare la connessione wireless utilizzando il terminale ed nmcli Nelle distribuzioni Linux come Debian e SysLinuxOS, la connessione wireless può essere configurata utilizzando l’interfaccia grafica del sistema Network Manager, ma in alcuni casi può essere necessario utilizzare la riga di comando. In questa guida vedremo come configurare la connessione wireless utilizzando il terminale

In primo luogo, è necessario identificare il nome dell’interfaccia wireless utilizzando il comando seguente:

$ nmcli device status

L’output del comando mostrerà l’elenco delle interfacce di rete disponibili. In questo esempio, l’interfaccia wireless è denominata “wlo1“. Successivamente, è possibile connettersi a una rete wireless WPA/WPA2 utilizzando il comando seguente:

$ nmcli device wifi connect ID ifname wlo1 password PASSWORD_RETE private yes hidden no

Dove “ID” è il nome della rete wireless e “PASSWORD_RETE” è la password della rete wireless. Inoltre, in questo esempio “wlo1” è il nome dell’interfaccia wireless. Se la connessione viene stabilita correttamente, è possibile verificare lo stato della connessione utilizzando il comando seguente:

$ nmcli connection show
disconnettersi dalla rete wireless attualmente connessa:
$ nmcli device disconnect wlo1

visualizzare le informazioni dettagliate sulla connessione wireless attiva:

$ nmcli connection show ID --show-secrets

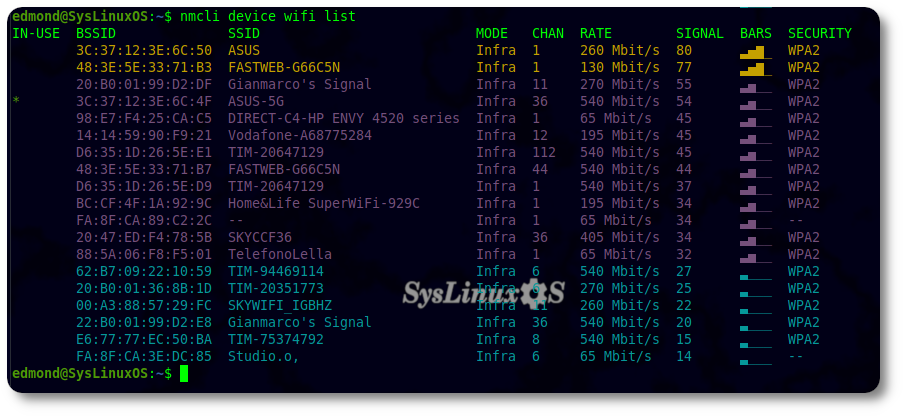
consultare l’elenco delle reti wireless disponibili, inclusi i loro canali, la qualità del segnale e altri dettagli:

$ nmcli device wifi list
mostrare password in chiaro e QRcode:
$ nmcli device wifi show-password ifname wlo1
rimuovere una connessione wireless:
$ nmcli connection delete ID
Interfaccia grafica:
$ nm-connection-editor
Connessione wifi da terminale via nmcli
enjoy 😉


Monitorare Raspberry Pi con RPI-Monitor


Monitorare Raspberry Pi con RPI-Monitor

Monitorare Raspberry Pi con RPI-Monitor


Guida su come monitorare via Web UI un server Raspberry Pi utilizzando RPI-Monitor.

sudo apt update
sudo apt install dirmngr -y
sudo wget http://goo.gl/vewCLL -O /etc/apt/sources.list.d/rpimonitor.list
sudo apt-key adv --recv-keys --keyserver keyserver.ubuntu.com E4E362DE2C0D3C0F
sudo apt update
sudo apt install rpimonitor
sudo /etc/init.d/rpimonitor update

abilitare rpi-monitor allo startup come servizio:

sudo nano /etc/systemd/system/rpimonitor.service

ed inserire le righe sotto:

[Unit]
Description=RPi-Monitor daemon
Before=multi-user.target
After=remote-fs.target
After=network-online.target
Wants=network-online.target

[Service]
Type=simple
Restart=on-failure
KillMode=mixed
Nice=19
ExecStartPre=/bin/sleep 10
ExecStart=/usr/bin/rpimonitord
ExecStop=/bin/kill $MAINPID
StandardOutput=append:/var/log/rpimonitor.log
StandardError=append:/var/log/rpimonitor.log

[Install]
WantedBy=multi-user.target

sudo systemctl daemon-reload
sudo systemctl enable rpimonitor

a questo punto si può accedere ad rpi-monitor all’indirizzo:

http://ip_address:8888

Monitorare Raspberry Pi con RPI-Monitor

enjoy 😉


NordVPN su SysLinuxOS e Debian 11


NordVPN su SysLinuxOS e Debian 11

NordVPN su SysLinuxOS e Debian 11


Guida su come configurare NordVPN, su SysLinuxOS e Debian 11 Bullseye, in modo grafico utilizzando Network Manager oppure direttamente da terminale.

Prerequisiti:

  • Abbonamento a NordVPN
  • SysLinuxOS Debian Bullseye e derivate

SysLinuxOS:

cd /etc/openvpn
sudo wget https://downloads.nordcdn.com/configs/archives/servers/ovpn.zip
sudo unzip ovpn.zip
sudo rm ovpn.zip
cd ovpn_udp
ls -al

Debian:

sudo apt-get install openvpn network-manager-openvpn-gnome ca-certificates unzip
sudo service network-manager restart
cd /etc/openvpn
sudo wget https://downloads.nordcdn.com/configs/archives/servers/ovpn.zip
sudo unzip ovpn.zip
sudo rm ovpn.zip
cd ovpn_udp
ls -al

per far partire la VPN, basta scegliere un server della lista:

sudo openvpn de1022.nordvpn.com.udp.ovpn

OpenVPN chiederà le credenziali, quindi inserire user e password.

Per utilizzare Network Manager, basta solo importare la configurazione del server scelto

NordVPN su SysLinuxOS e Debian 11

NordVPN su SysLinuxOS e Debian


enjoy 😉


Configurare Samba server su Debian 11 e SysLinuxOS


Samba è un software gratuito che consente di condividere file in rete utilizzando il protocollo SMB (Server Message Block). Samba è supportato su varie piattaforme come i sistemi operativi Windows e Unix. Guida per OS Debian based e SysLinuxOS

Step 1 Installazione
sudo apt install samba smbclient cifs-utils
Step 2 Creazione cartelle condivisione:
sudo mkdir /mnt/{private,public}
Step 3 Configurazione smb.conf
sudo nano /etc/samba/smb.conf

ed aggiunger in fondo:

[public]
comment = Public Folder
path = /mnt/public
writable = yes
guest ok = yes
guest only = yes
force create mode = 775
force directory mode = 775


[private]
comment = Private Folder
path = /mnt/private
writable = yes
guest ok = no
valid users = @smbshare
force create mode = 770
force directory mode = 770
inherit permissions = yes
Step 4 Creazione utente e gruppo:
sudo groupadd smbshare
sudo chgrp -R smbshare /mnt/private/
sudo chgrp -R smbshare /mnt/public
sudo chmod 770 /mnt/private/
sudo chmod 775 /mnt/public
sudo useradd -M -s /sbin/nologin sambauser
sudo usermod -aG smbshare sambauser
sudo smbpasswd -a sambauser
sudo smbpasswd -e sambauser

Verificare funzionamento:

sudo touch /mnt/private/test1.txt /mnt/public/test2.txt
sudo systemctl restart smbd

Accesso locale:

smbclient '\\localhost\public' -U sambauser

output ls:

edmond@syslinuxbox:~$ smbclient '\\localhost\public' -U sambauser
Enter WORKGROUP\sambauser's password:
Try "help" to get a list of possible commands.
smb: \> ls
. D 0 Sat May 28 16:52:47 2022
.. D 0 Sat May 28 16:48:41 2022
test2.txt N 0 Sat May 28 16:52:47 2022

69977312 blocks of size 1024. 40744856 blocks available
smb: \>

Accesso da client Linux:

un metodo veloce è quello di aprire il proprio file manager, nel mio caso Caja, ed inserire il percorso:

smb://sambauser@ip_address/public/

Configurare Samba server su Debian 11 e SysLinuxOS

Configurare Samba server su Debian 11 e SysLinuxOS

enjoy 😉

XAMPP PHP 8 su Debian Bullseye


XAMPP PHP 8 su Debian Bullseye

XAMPP PHP 8 su Debian Bullseye

XAMPP è una suite completamente gratuita e facile da installare che contiene Apache, MariaDB, PHP, e Perl. La pagina di download è la seguente, una volta scaricato l’installer, cambiare i permersi ed iniziare l’installazione:

$ chmod 755 xampp-linux-*-installer.run
$ sudo ./xampp-linux-*-installer.run --mode gtk --installer-language it

alla fine si potrà scegliere di lanciare subito xampp, e quindi andare in Manage-Servers per avviare i servizi. La schermata iniziale è raggiungibile all’indirizzo https://localhost/. Per avviare xampp da interfaccia grafica quindi utilizzare:

$ sudo /opt/lampp/manager-linux-x64.run

altrimenti si possono utilizzare i seguenti singoli comandi:

$ sudo /opt/lampp/xampp start
$ sudo /opt/lampp/xampp stop
$ sudo /opt/lampp/xampp restart
$ sudo /opt/lampp/xampp startapache
$ sudo /opt/lampp/xampp startmysql
$ sudo /opt/lampp/xampp startftp
$ sudo /opt/lampp/xampp stopapache
$ sudo /opt/lampp/xampp stopmysql
$ sudo /opt/lampp/xampp stopftp
$ sudo /opt/lampp/xampp enablessl
$ sudo /opt/lampp/xampp disablessl

Per il server ProFTP: nome utente «nobody», password «lampp». E’ necessario mettere in sicurezza xampp, creando le password di accesso per i vari servizi. Il comando è il seguente:

$ sudo /opt/lampp/xampp security
XAMPP PHP 8 su Debian Bullseye

enjoy 😉


Server DHCP su Debian 11


Server DHCP su Debian 11 Bullseye.


Installazione e configurazione di un server dhcp su Debian Bullseye:

$ sudo su
# apt install isc-dhcp-server

settare la scheda di rete da utilzzare, nel mio caso eth0:

# nano /etc/default/isc-dhcp-server
# Defaults for isc-dhcp-server initscript
# sourced by /etc/init.d/isc-dhcp-server
# installed at /etc/default/isc-dhcp-server by the maintainer scripts

#
# This is a POSIX shell fragment
#

# Path to dhcpd's config file (default: /etc/dhcp/dhcpd.conf).
#DHCPD_CONF=/etc/dhcp/dhcpd.conf

# Path to dhcpd's PID file (default: /var/run/dhcpd.pid).
#DHCPD_PID=/var/run/dhcpd.pid

# Additional options to start dhcpd with.
#       Don't use options -cf or -pf here; use DHCPD_CONF/ DHCPD_PID instead
#OPTIONS=""

# On what interfaces should the DHCP server (dhcpd) serve DHCP requests?
#       Separate multiple interfaces with spaces, e.g. "eth0 eth1".
INTERFACES="eth0"

poi modificare il file dhcpd.conf inserendo i parametri della nostra rete, nel mio caso 192.168.100.0/24:

# nano /etc/dhcp/dhcpd.conf
# Sample configuration file for ISC dhcpd for Debian
#
#

# The ddns-updates-style parameter controls whether or not the server will
# attempt to do a DNS update when a lease is confirmed. We default to the
# behavior of the version 2 packages ('none', since DHCP v2 didn't
# have support for DDNS.)
ddns-update-style none;

# option definitions common to all supported networks...
option domain-name "example.org";
option domain-name-servers ns1.example.org, ns2.example.org;
default-lease-time 600;
max-lease-time 7200;

# If this DHCP server is the official DHCP server for the local
# network, the authoritative directive should be uncommented.
#authoritative;

# Use this to send dhcp log messages to a different log file (you also
# have to hack syslog.conf to complete the redirection).
log-facility local7;

# No service will be given on this subnet, but declaring it helps the
# DHCP server to understand the network topology.

#subnet 10.152.187.0 netmask 255.255.255.0 {
#}

# This is a very basic subnet declaration.
subnet 192.168.100.0 netmask 255.255.255.0 {
range 192.168.100.150 192.168.100.160;
option routers 192.168.100.1;
option subnet-mask 255.255.255.0;
option broadcast-address 192.168.100.254;
option domain-name-servers 192.168.100.1, 192.168.100.2;
option ntp-servers 192.168.100.1;
option netbios-name-servers 192.168.100.1;
option netbios-node-type 8;
}
#subnet 10.254.239.0 netmask 255.255.255.224 {
#  range 10.254.239.10 10.254.239.20;
#  option routers rtr-239-0-1.example.org, rtr-239-0-2.example.org;
#}

# This declaration allows BOOTP clients to get dynamic addresses,
# which we don't really recommend.

#subnet 10.254.239.32 netmask 255.255.255.224 {
#  range dynamic-bootp 10.254.239.40 10.254.239.60;
#  option broadcast-address 10.254.239.31;
#  option routers rtr-239-32-1.example.org;
#}

# A slightly different configuration for an internal subnet.
#subnet 10.5.5.0 netmask 255.255.255.224 {
#  range 10.5.5.26 10.5.5.30;
#  option domain-name-servers ns1.internal.example.org;
#  option domain-name "internal.example.org";
#  option routers 10.5.5.1;
#  option broadcast-address 10.5.5.31;
#  default-lease-time 600;
#  max-lease-time 7200;
#}

# Hosts which require special configuration options can be listed in
# host statements.   If no address is specified, the address will be
# allocated dynamically (if possible), but the host-specific information
# will still come from the host declaration.

#host passacaglia {
#  hardware ethernet 0:0:c0:5d:bd:95;
#  filename "vmunix.passacaglia";
#  server-name "toccata.fugue.com";
#}

# Fixed IP addresses can also be specified for hosts.   These addresses
# should not also be listed as being available for dynamic assignment.
# Hosts for which fixed IP addresses have been specified can boot using
# BOOTP or DHCP.   Hosts for which no fixed address is specified can only
# be booted with DHCP, unless there is an address range on the subnet
# to which a BOOTP client is connected which has the dynamic-bootp flag
# set.
#host fantasia {
#  hardware ethernet 08:00:07:26:c0:a5;
#  fixed-address fantasia.fugue.com;
#}

# You can declare a class of clients and then do address allocation
# based on that.   The example below shows a case where all clients
# in a certain class get addresses on the 10.17.224/24 subnet, and all
# other clients get addresses on the 10.0.29/24 subnet.

#class "foo" {
#  match if substring (option vendor-class-identifier, 0, 4) = "SUNW";
#}

#shared-network 224-29 {
#  subnet 10.17.224.0 netmask 255.255.255.0 {
#    option routers rtr-224.example.org;
#  }
#  subnet 10.0.29.0 netmask 255.255.255.0 {
#    option routers rtr-29.example.org;
#  }
#  pool {
#    allow members of "foo";
#    range 10.17.224.10 10.17.224.250;
#  }
#  pool {
#    deny members of "foo";
#    range 10.0.29.10 10.0.29.230;
#  }
#}

dopo le modifiche riavviare il servizio:

# systemctl restart isc-dhcp-server.service
Server DHCP su Debian 11 Bullseye

enjoy ?

VirtualBox on Debian 11 Bullseye


VirtualBox on Debian 11 Bullseye


VirtualBox on Debian 11 Bullseye

Attualmente non esistono repository per Debian 11 bullseye per installare VirtualBox, ma solamente quelli per Debian 10. Ma sul sito Oracle esiste una versione “all distributions” che funziona su Debian 11. Si tratta di uno script che installerà VirtualBox 6.1 senza problemi:

Scaricare e salvare lo script, oppure:

$ sudo apt install build-essential linux-headers-amd64
$ wget https://download.virtualbox.org/virtualbox/6.1.22/VirtualBox-6.1.22-144080-Linux_amd64.run
$ chmod +x VirtualBox*
$ sudo ./VirtualBox*

esiste anche VirtualBox Extension Pack 6.1.22.

VirtualBox on Debian 11 Bullseye

enjoy 😉


AnyDesk su Debian 11

AnyDesk su Debian 11AnyDesk su Debian 11

Guida su come installare AnyDesk, su Debian 10 e Debian 11. AnyDesk è un alternativa a Teamviewer, ed è uno strumento veloce ed affidabile per il controllo remoto. Su Debian 10 Buster e Debian 11 Bullseye, può essere installato via repository:

Installazione:

$ sudo su
# apt install wget
# wget -qO - https://keys.anydesk.com/repos/DEB-GPG-KEY | apt-key add -
# echo "deb http://deb.anydesk.com/ all main" > /etc/apt/sources.list.d/anydesk-stable.list
# apt update
# apt install anydesk -y

AnyDesk su Debian 11

enjoy 😉


How to enable Wireshark like user

Wireshark should non-superusers be able to capture packets
How to enable Wireshark like user

Nel momento in cui si installa wireshark, viene mostrato la possibilità di scegliere, tra l’utilizzo come normale utente , oppure come consigliato, da root. Purtroppo la scelta di avviare wireshark come semplice user, non funziona, almeno in Debian 10/11, per un problema di permessi “Wireshark should non-superusers be able to capture packets”.

Soluzione:

sudo usermod -a -G wireshark $USER
sudo chgrp wireshark /usr/bin/dumpcap
sudo chmod 755 /usr/bin/dumpcap
sudo setcap cap_net_raw,cap_net_admin=eip /usr/bin/dumpcap

enjy 😉


Huawei ME936 modulo LTE Debian 10


Huawei ME936 modulo LTE Debian 10


Per uno dei miei notebook workstation, Schenker XMG P507, ho comprato un modulo LTE Huawei ME936, che per farlo funzionare, su Debian 10, c’è bisogno di qualche trick. Dopo aver creato una connessione Mobile Broadband, tramite Network-Manager, non si riesce a navigare, e come si può vedere sotto con i due comandi, la scheda viene riconosciuta:

$ lsusb
$ usb-devices

output:

edmond@debianbox:~$ lsusb
Bus 002 Device 001: ID 1d6b:0003 Linux Foundation 3.0 root hub
Bus 001 Device 005: ID 04f2:b5a7 Chicony Electronics Co., Ltd
Bus 001 Device 004: ID 8087:0a2b Intel Corp.
Bus 001 Device 003: ID 1c7a:0603 LighTuning Technology Inc.
Bus 001 Device 002: ID 12d1:15bb Huawei Technologies Co., Ltd. ME936 LTE/HSDPA+ 4G modem
Bus 001 Device 001: ID 1d6b:0002 Linux Foundation 2.0 root hub
edmond@debianbox:~$ usb-devices

T: Bus=01 Lev=00 Prnt=00 Port=00 Cnt=00 Dev#= 1 Spd=480 MxCh=16
D: Ver= 2.00 Cls=09(hub ) Sub=00 Prot=01 MxPS=64 #Cfgs= 1
P: Vendor=1d6b ProdID=0002 Rev=05.10
S: Manufacturer=Linux 5.10.0-0.bpo.4-amd64 xhci-hcd
S: Product=xHCI Host Controller
S: SerialNumber=0000:00:14.0
C: #Ifs= 1 Cfg#= 1 Atr=e0 MxPwr=0mA
I: If#=0x0 Alt= 0 #EPs= 1 Cls=09(hub ) Sub=00 Prot=00 Driver=hub

T: Bus=01 Lev=01 Prnt=01 Port=05 Cnt=01 Dev#= 2 Spd=480 MxCh= 0
D: Ver= 2.00 Cls=ef(misc ) Sub=02 Prot=01 MxPS=64 #Cfgs= 3
P: Vendor=12d1 ProdID=15bb Rev=00.01
S: Manufacturer=Huawei Technologies Co., Ltd.
S: Product=HUAWEI Mobile Broadband Module
C: #Ifs= 3 Cfg#= 3 Atr=a0 MxPwr=500mA
I: If#=0x0 Alt= 0 #EPs= 1 Cls=02(commc) Sub=0e Prot=00 Driver=cdc_mbim
I: If#=0x1 Alt= 1 #EPs= 2 Cls=0a(data ) Sub=00 Prot=02 Driver=cdc_mbim
I: If#=0x2 Alt= 0 #EPs= 2 Cls=ff(vend.) Sub=05 Prot=14 Driver=option

T: Bus=01 Lev=01 Prnt=01 Port=06 Cnt=02 Dev#= 3 Spd=12 MxCh= 0
D: Ver= 1.10 Cls=00(>ifc ) Sub=00 Prot=00 MxPS=64 #Cfgs= 1
P: Vendor=1c7a ProdID=0603 Rev=02.00
S: Manufacturer=EgisTec
S: Product=EgisTec_ES603
C: #Ifs= 1 Cfg#= 1 Atr=a0 MxPwr=100mA
I: If#=0x0 Alt= 0 #EPs= 2 Cls=ff(vend.) Sub=00 Prot=00 Driver=(none)

T: Bus=01 Lev=01 Prnt=01 Port=07 Cnt=03 Dev#= 4 Spd=12 MxCh= 0
D: Ver= 2.00 Cls=e0(wlcon) Sub=01 Prot=01 MxPS=64 #Cfgs= 1
P: Vendor=8087 ProdID=0a2b Rev=00.10
C: #Ifs= 2 Cfg#= 1 Atr=e0 MxPwr=100mA
I: If#=0x0 Alt= 0 #EPs= 3 Cls=e0(wlcon) Sub=01 Prot=01 Driver=btusb
I: If#=0x1 Alt= 0 #EPs= 2 Cls=e0(wlcon) Sub=01 Prot=01 Driver=btusb

T: Bus=01 Lev=01 Prnt=01 Port=08 Cnt=04 Dev#= 5 Spd=480 MxCh= 0
D: Ver= 2.00 Cls=ef(misc ) Sub=02 Prot=01 MxPS=64 #Cfgs= 1
P: Vendor=04f2 ProdID=b5a7 Rev=36.01
S: Manufacturer=SunplusIT Inc
S: Product=Chicony USB 2.0 Camera
C: #Ifs= 2 Cfg#= 1 Atr=80 MxPwr=500mA
I: If#=0x0 Alt= 0 #EPs= 1 Cls=0e(video) Sub=01 Prot=00 Driver=uvcvideo
I: If#=0x1 Alt= 0 #EPs= 0 Cls=0e(video) Sub=02 Prot=00 Driver=uvcvideo

T: Bus=02 Lev=00 Prnt=00 Port=00 Cnt=00 Dev#= 1 Spd=5000 MxCh= 8
D: Ver= 3.00 Cls=09(hub ) Sub=00 Prot=03 MxPS= 9 #Cfgs= 1
P: Vendor=1d6b ProdID=0003 Rev=05.10
S: Manufacturer=Linux 5.10.0-0.bpo.4-amd64 xhci-hcd
S: Product=xHCI Host Controller
S: SerialNumber=0000:00:14.0
C: #Ifs= 1 Cfg#= 1 Atr=e0 MxPwr=0mA
I: If#=0x0 Alt= 0 #EPs= 1 Cls=09(hub ) Sub=00 Prot=00 Driver=hub
edmond@debianbox:~$

La soluzione è quella di creare un file “udev-rule”, dove inserire in maniera specifica i parametri necessari:

$ sudo nano /etc/udev/rules.d/71-huawei-me936conf.rules

ed incollare dentro:

ACTION=="add|change", SUBSYSTEM=="usb", \
ENV{DEVTYPE}=="usb_device", \
ATTR{idVendor}=="12d1", ATTR{idProduct}=="15bb", \
ATTR{bNumConfigurations}=="3",
ATTR{bConfigurationValue}!="3" \
ATTR{bConfigurationValue}="3"

dopo aver riavviato, si potrà utilizzare la connessione LTE.

Huawei ME936 modulo LTE Debian 10

enjoy 😉